
Recipes & Crafts
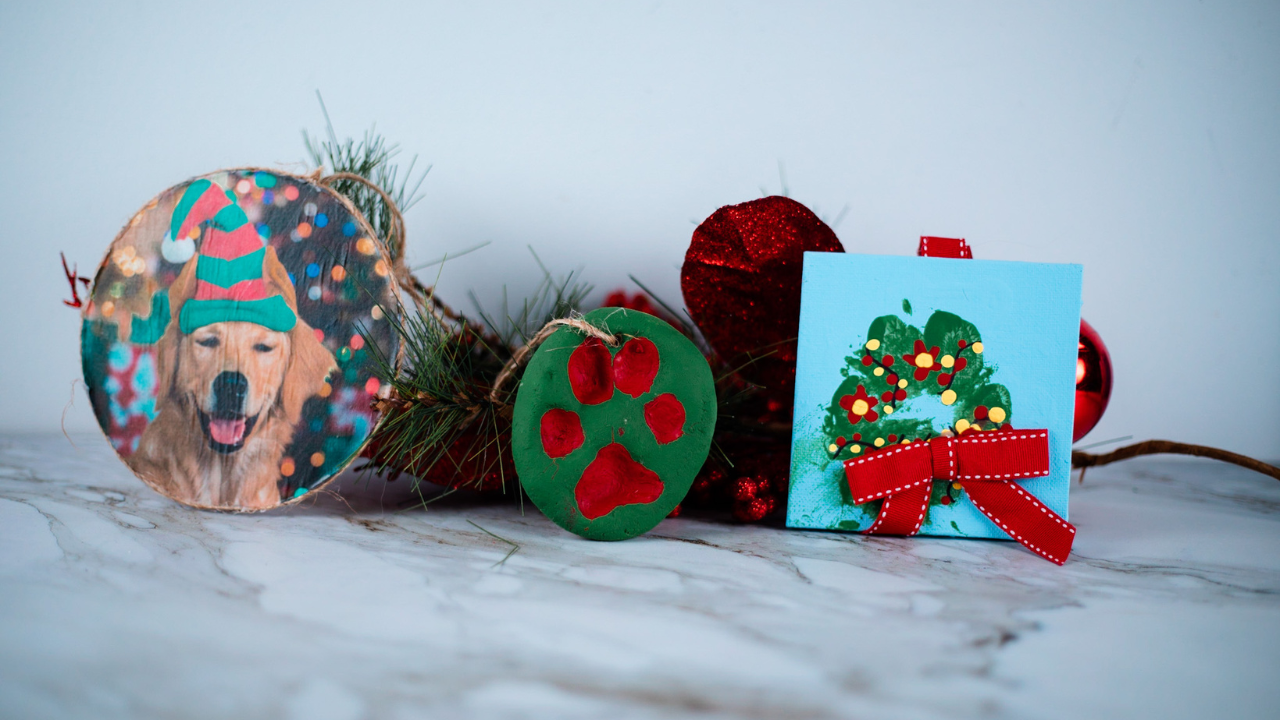
3 Christmas Ornaments to make with your Dog
Unleash the festive spirit with your furry friend! Create 3 easy, low-cost homemade Christmas ornaments inspired by your dog using simple items from your local dollar store. Strengthen your bond and make timeless memories with these Paw-some DIY crafts - perfect for a dog-loving holiday season!
Making a homemade Christmas ornament can be a fun way to celebrate the holidays with your dog! Here are 3 different ways to create an ornament inspired by your dog! Each of these crafts is inexpensive and can be made using items found at your local dollar store.

One of these ornaments includes painting your dog’s paw. These are some tips to be more successful and have a less stressful experience painting with your pet:
- Have a wash station with a towel ready to clean any paint off your dog’s paw.
- Wear clothes that can get dirty.
- Chances are this is going to be a unique experience for your dog and you’re going to get some paint places you wish you wouldn’t have. We promise it will all be worth it.
- It may be easier to use a paint brush to paint your dog’s paw, this allows for a thinner layer of paint compared to dipping your dog's paw. That means less mess and less ‘printing’ your dog’s paw to get the right look.
- Have everything you are going to need ready to go and within arms reach. The quicker you can make this the easier of an experience it is going to be for your dog.
- It can be helpful to have some extra hands around to help!

Paw Print Small Canvas Christmas Ornament
- Non-toxic green paint
- Paint brush
- Black Sharpie
- Red, yellow, or other paint colors
- Small sized canvas 4" x 4"
- Christmas ribbon
- Glue gun with glue sticks
1. Use a towel or newspaper to paint on, while having paint and a paintbrush ready to go.
2. Lay your dog conformably over the painting area.
3. Using your nontoxic green paint and paintbrush, paint one of your dogs’ paws, the one you think will be the easiest. You want to apply a generous coat of paint but avoid applying a thick layer.
4. Press your dog’s paw onto your small sized canvas.
5. Set the canvas aside and immediately wash your dog’s paw and dry it with a towel. Don’t forget to give them treats for their helping!
6. Allow your canvas to dry for a few hours or until the paint dries to the touch.
7. With a black Sharpie, draw a line around the paw print to create a string of Christmas lights.
8. Use the other colored paints to add in the Christmas “lights”. A fine paint brush works great to drop perfect sized lights.
9. Draw any other decorations to personalize your wreath. We painted red flowers with a yellow center on ours.
10. Allow the paint to dry completely. Don’t forget to write the year and your dog’s name on the back.
11. Use a hot glue gun to attach a Christmas bow to the bottom of the paw print wreath.
12. Cut another piece of ribbon to create a hanger on the back. Use the hot glue to hold it in place.
13. When the glue is dry, the ornament is ready to hang on your Christmas tree!

Salt Dough Paw Print Ornament
We make salt dough every Christmas and it is one of my favorites to create paw print ornaments.
- 1 ½ cup flour
- 1 cup salt
- ½ cup water
- Skewer
1. Mix salt, flour, and water together in a mixing bowl. Add extra flour to get the dough to be a play dough like consistency.
2. Knead the dough for 2-5 minutes until it feels like play dough.
3. Shape small amounts of dough into balls.
4. Flatten the balls to ½ inch thickness.
5. Set your ovals on a clean part of the ground.
6. Have your pet stand, allowing you to press their foot into the dough creating a paw imprint.

7. Use a skewer or something similar in size to create a hole through the top part of the ornament.
8. Bake the finished ornament at 200 in an oven for 2 – 3 hours.
9. Allow them to cool completely before decorating.
10. Time to decorate! Get creative and have fun with this step!
11. Put a Christmas ribbon or twine through the hole at the top of the ornament to create a hanger.
12. When the paint is dry, write your pet’s name and the year on the back of your new ornament before hanging it on your Christmas tree.

Photo Transfer Wood Ornament
- Matte finish Modge Podge
- A printed photo of your dog on regular paper
- Wood slab
- Twine or ribbon
- Hot glue gun and glue sticks
1. Pick a surface to work on that can get messy.
2. Cover your wood slab in a thick coat of Modge Podge. Note that any paint brush or sponge you use will likely need to be thrown into the trash afterwards. We used a small piece cut off a sponge.
3. Take your photo and place it on top of the Modge Podge side of the wood slab.
4. Use a sponge or paint brush to apply another thinner coat of Modge Podge on top of the picture. Smooth out any lumps or bumps.
5. Allow the Modge Podge to completely dry.
6. Cut the edges off the paper tight against the wood slab.
7. Using a hot glue gun, glue some twine around the edge for an extra touch.
8. Make a hanger using twine or ribbon and hot glue it to the back of your new ornament.
9. When the glue is dry, use a sharpie marker to write your dog's name and the year on the back of the ornament before hanging it on your tree.

BONUS RECIPE
Memory Christmas Ball Ornament
- Clear plastic Christmas ball
- Sheet of paper
- Colored Sharpie pens
- Fine tip black Sharpie
1. Remove the top hanger from the clear plastic Christmas ball ornament so that you can put things inside.
2. Pick any color paper to wish to use. Some prefer Christmas colors but we chose white.
3. Cut the paper into strips to write on.
4. Using a fine tip Sharpie, write some of your favorite memories with your pet from the past year.
5. Take the completed paper strip and wrap it tightly around the sharpie so the paper curls.
6. Hold the paper curl tight and put it inside the clear Christmas ball
7. Repeat this process with as many memories you wish to include.
8. Once finished, place the top back on the Christmas ball.
9. Now take any colored Sharpie and write your pet’s name and the year on the outside of the Christmas ball.
You now have the perfect meaningful Christmas ornament to remind you of the incredible year you had with your pet.
Upgrade Your Pet’s Health the Natural Way
Unlock your pet's health potential with expert advice from Dr Michelle Dulake! Start making informed decisions today with her cutting-edge insights, backed by years of experience and research. Don't miss out – secure a brighter, healthier future for your furry friend!
At Fera Pet Organics, we’re committed to using only the most natural high-quality ingredients to keep your furry family members healthy and happy for as long as possible.
We’d love to hear from you! What do you want to learn about next? Do you have any comments or questions? Reach us at hello@ferapets.com!
Share Your Learnings
